

How to Deploy a Cato Networks vSocket in Azure

Ronnie Hamilton
Principal Technical Consultant
DataSolutions
Cato Networks has been providing access into your Azure Cloud resources for a long time, but the build of the vSocket, if you have attempted it, is quite convoluted. Thankfully they have streamlined the process significantly and currently have an early access version available on the Azure Marketplace to allow you to connect in your Azure resources to the rest of your Cato Networks infrastructure.
Let's dive in to see how much easier the new method is, you will need your Azure subscription and a Cato Networks tenant.
The following diagram represents what we will build in the following blog post.

Step 1
Create a new Resource Group to Keep things together
Select > create

Step 2
Select > Appropriate Subscription
Enter > Resource Group name = RG-Cato-vSocket
Select > Region = North Europe (or any region that makes sense for you)

Step 3
Select > Next: Review + Create

Step 4
Select > Create
At this point you could potentially create the Virtual Network in azure as I did the first time, but you do not need to as when you build the Cato vSocket this will automatically create all the virtual networks needed for the socket to function correctly.
You must also create the site in the Cato Portal so that you can get the unique identifier which is needed as you create the vSocket in Azure, this can be created as you are deploying the vSocket in Azure but I find it’s easier if you create it first then you can stay in the Azure console from start to finish.
Let's jump into the Cato management portal and create the Azure site.

Step 5
Select > Network from the top menu structure
Select > New

Enter all the details for your site taking into consideration any network IP ranges you want to use in your configuration, you create the first LAN network then add other afterwards.
Note: The IP address and subnet created here will be temporary and you will have to come back and change to match what you will create in Azure.
Step 6
Enter > Site Name = DS-Azure-VNet-Cato
Enter > Site type = Cloud Data Centre
Select > vSocket
Select > Country = UK (United Kingdom)
Select > Time Zone = London
Enter > required Bandwidth in Mbps
Enter > Lan Interface Settings Native Range Local IP
Select > Apply

Step 7
Select > DS-Azure-Site
Select > Actions
Select > Enable

Now that you have the Cato Azure Site set up, you can jump back to the Azure Portal and go to the marketplace and search for Cato Networks Virtual Socket.
Step 8
Select > Azure Marketplace

Step 9
Search > Cato
Select > Create

Step 10
Select > Cato Socket Template

Step 11
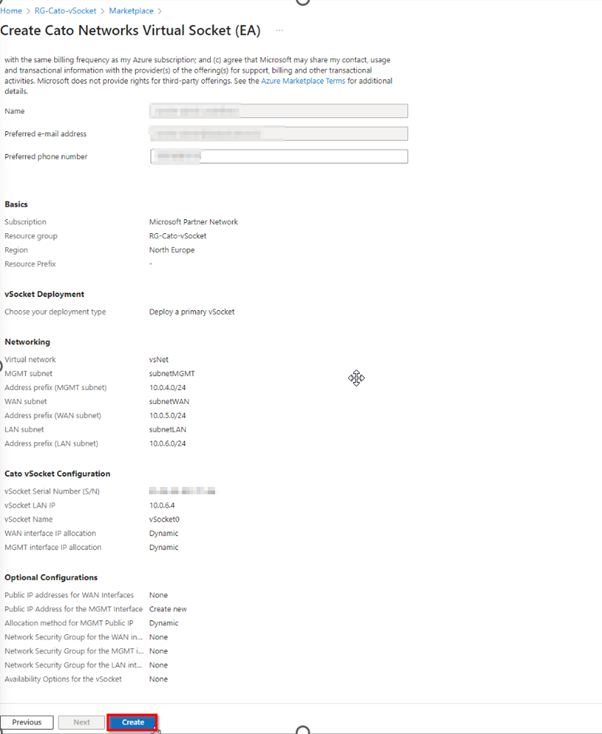
Create the Azure socket – Fill in all your details as follows.
Select > Resource Group = RG-Cato-vSocket
Select > Region = North Europe
Select > Next

Step 12
Select > Create

Step 13
Select > Resource Group = RG-Cato-vSocket
Select > Region = North Europe
Select > Next

You can allow Cato to just use the next available Azure Networks, which is the easiest for the purpose of a test environment. If you need to pre-define your Azure IP’s and Subnets in a more complex network this can also be done, and you would then be able to pick the pre-defined Networks from the drop down list for MGMT, WAN & LAN.
At this point, if you did not give your Cato site the correct IP address and Network that is getting auto created in Azure, now you can pop over to the Cato portal and change it.
Now that you have your Network and subnets created in Azure you can go to the Cato portal and give your Azure vSocket the correct IP and subnet that matches the management range of the one that will be created in Azure.
Step 14
Select > Network
Select > Site Configuration
Select > Edit IP range to match the MGT Subnet in Azure
Select > Edit Local IP to match the subnet and use .4 as it is the first available for use
Select > Apply

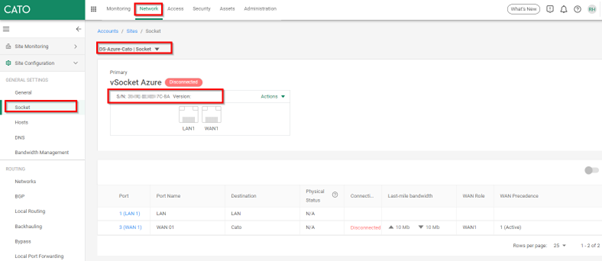
Step 15
Then check the vSocket Azure S/N and copy it as you will need it to make the connection from Azure.
Step 16
Jump back over to the Azure Portal
Enter > the IP address you have given to the vSocket on the Cato site

Step 17
Enter > vSocket Serial Number that you copied from the site in the Cato Management Portal
Select > Next

Step 18
Select > Dynamic
Select > Next

Step 19
Select > Next

Step 20
Select > Create
Step 21
The deployment will take around 5 minutes.

Step 22
You can check the vSocket is running, by going to the resource group used and check the VM is running.

Step 23
Also, in the Cato portal you can check if the site is connected. The site is automatically associated with the vSocket and assuming the deployment was successful the vSocket will connect to the Cato cloud and establish the secure tunnel

Last step!
This final test is to build a windows VM in the same Azure vNet and check which ISP you are connected to.

Iou have any questions feel free to reach out to Ronnie on LinkedIn
Connect with Ronnie on LinkedIn | Check out Ronnie’s recent blogs below.


